
You might be wondering what an infinity curve actually is, so let’s start there.
In simple terms, an infinity curve (also called a cove or scoop) uses a single surface to form both the floor and the wall of your set in one continuous curve. In large studios these are often permanent built structures, but for still life and product photography you can create the same effect on a smaller scale using a flexible vinyl backdrop.
The defining feature of an infinity curve is the lack of joins. With no corner or hard angle, shadows don’t collect and there’s no visual horizon line cutting across the image. The result is a seamless background that feels clean and uninterrupted.
So why use an infinity curve for food or still life photography?
Like most styling choices, it comes down to creative direction. Infinity curves create a minimal, stylised, sometimes slightly ethereal look. They’re usually better suited to product-led or editorial imagery rather than lifestyle scenes that aim to feel natural or domestic.
Using one continuous surface automatically reduces visual elements and colour variation. The absence of shadow lines keeps everything clean and simple, which helps the subject become the clear focal point. The overall feel leans towards graphic, editorial and controlled. They’re also particularly useful if you need space for text or graphics, as there are no joins or shadows to compete with overlays.
For home photographers there are practical advantages too. Infinity curves are inexpensive (fewer props), quick to set up and work well in small spaces. A kitchen worktop against a wall or a tabletop with a simple support behind the backdrop is often all you need. The curve also helps hide surrounding clutter outside the frame.
It sounds ideal – and it can be. But there are a few key considerations that make the difference between a convincing infinity curve and one that doesn’t quite work.
5 considerations when using an infinity curve for still life and food photography
Selecting the best backdrop design
To create a curve you need a flexible surface. Because an infinity curve is inherently stylised rather than lifestyle-realistic, the photography backdrop works best when it has subtle, abstract qualities and a fairly consistent tone across the design. This maintains the illusion of continuous space. Our unique, smooth matte vinyl photography backdrops hold a lovely flat shape or curve, helping you avoid tonnes of editing.
Literal surfaces such as wood planks, tiles or marble patterns tend to break the effect. They imply rigid materials that wouldn’t naturally bend, so the curve instantly looks visually wrong to the human eye.
Shot on the Peanut vinyl photography backdrop
Choosing the right angle
The most effective camera angles for infinity curves are low and straight-on, roughly at the height of your subject.
This does two things. First, it reduces how much of the curved transition area is visible, which is the hardest area to light cleanly. Second, it allows the subject to sit toward the front of the set, leaving more background space behind and helping depth fall away naturally.
Shooting straight-on at subject height has a similar flattening effect to flatlay in that it reduces perceived depth, but it still allows you to create layers by moving elements forward and back within the scene.
Because of this angle, taller subjects tend to work best – drinks, cakes, burgers, candles or vases – as they fill more of the frame. Flatter foods can appear compressed from this viewpoint.
This perspective also reinforces the graphic, silhouette-led quality that infinity curve styling naturally supports.

Focal depth
When used as an infinity curve, the backdrop becomes a very subtle styling element. Instead of a defined surface with visible texture and contrast, it reads as a soft field of colour with gentle graduated shadow.
Infinity curves look particularly effective when allowed to fall out of focus as much as your lens allows. A shallower depth of field helps maintain that seamless, atmospheric feel.
If unsure where to start, try around f/5 and open wider from there. If shooting on a phone, portrait mode can help soften the background and enhance the effect.
Lighting
Infinity curves can work for both light, airy images and darker, moodier styling. If you’re newer to lighting, it’s usually easier to pair dark backdrops with moody setups and light backdrops with bright ones. Pushing a dark backdrop into a bright look (or vice versa) can quickly start to feel poorly lit rather than intentional.
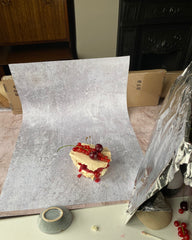
For darker moods, you’ll often need to flag (block) light hitting the back wall of the curve – typically from the light side, and sometimes from above as well. Black card or foamboard works perfectly for this and can be folded to stand where needed.
You may also notice, especially on darker surfaces, that the curved transition area reflects the most light. This can be softened by adding flags, diffusing the light source or placing props strategically to break up the reflection.
Here’s how the lighting evolved for this setup after a few adjustments:
-
turning the set slightly away from the light source
-
adding black card to block light from the backdrop
-
introducing diffusion
-
adding vertical black card opposite the light side at the back of the curve

The first adjustment was to simply turn away from the light source


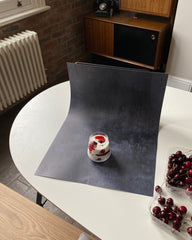
In the second, black card is used to (flag) block the light off the backdrop. We also added more vertical black card to the right directly opposite the one on the left at the back of the curve.

Image by Suze at Gourmet Glow. Shot on our Powder blue vinyl photography backdrop

Shot on our Bright Copper waterproof vinyl photography backdrop
Styling
Infinity curves naturally lend themselves to arrangements that feel clean, graphic and editorial. The result can be soft or punchy, moody or delicate, but it will always read as stylised and product-led rather than lifestyle.
Because shallow depth of field works so well with this setup, infinity curves are particularly suited to macro food photography and tight still life crops – ideal for social content and close framing.
Infinity curves can feel like a bit of a curveball at first, but once the balance is right they’re a simple, versatile way to create seamless scenes with ease!
4 comments
A very interesting article and you covered lots of areas.
Thanks for this informative article. I received one as a present recently and had no idea how to start. Mine is a cube minus the front which folds flat for storage. It has a shiny silver interior and several double sided coloured cards which create the infinity curve. The cards are all shiny which confuse me as I don’t know how to limit the shine. It also has a light ring at the top which I don’t know how to use. I’m thinking of buying some matt black card to start with. HELP!
Thanks for this. Really helpful to see pictures of set ups. I’ve tried it in the past but struggled to minimise the light bouncing off the curve. Will have to have another play and see if I can get rid of that distracting band of light!
Thanks a lot for such a great article. this is so useful to me, I am looking forward for many such wonderful articles from you.